Pages

Thursday, 9 August 2012

Caramel Macchiato Cupcakes

As addicting as the drink itself!


Wow I have definitely neglected this blog..for a good few months! I had actually made these yummy cupcakes back in spring when my manager had left the company I was working at...but now I don't even work there anymore! With the travelling, job change, and moving cities, my life was just a bit too hectic for me to sit down and relax. When everything finally settled down, wonderful summer came around and I just could not stay inside and miss the amazing weather! If you know Saskatchewan Canada at all, you would know that beautiful hot weather doesn't ever last long enough, and every day counts! So now that I've had a healthy dose of Vitamin D, I can appreciate the down time and relax with some writing.

I must say these were my absolute favorite cupcakes I have ever made, and I wouldn't change a single thing about them! It was my first time trying Swiss Meringue Buttercream Icing, and I was pretty nervous. But no great things ever came about playing it safe so I took the risk. If you've never made this type of icing before, it could be very intimidating. Any directions that called for tools such as candy thermometers and double boilers scared me away for a good few years until now! But well worth it...once you try Swiss Meringue you will NEVER go back...so do it!

The cakes themselves were soft and fluffy to start with, after being glazed with coffee, they became super moist. The slight bitterness of the coffee made these cupcakes not overly sweet which balanced perfectly with the buttery sweetness of the icing! I could eat these all day everyday...serious! It tastes exactly like the Starbucks drink and could probably be equally as addicting. I'm not usually a coffee drinker and would only have the occasional mug, but whether you are a coffee lover or not, you will fall in love with these!

I am most definitely not the most creative girl in the kitchen and is in no way an expert at forming my own recipes, so of course, the below had been adapted from others' brilliant minds. Let's go!


For the Cupcakes :

2 cups all-purpose flour

1 teaspoon baking powder

1/4 teaspoon baking soda

1/4 teaspoon salt

1/2 cup boiling water

2 tablespoons instant espresso powder

1/4 cup whole milk

1 stick unsalted butter, at room temperature

1/2 cup granulated sugar

1/2 cup packed light brown sugar

2 large eggs

Preheat oven to 350 degrees. Whisk together flour, baking powder, baking soda, and salt. Pour water over espresso powder; let cool. Combine espresso with milk. Beat butter and granulated and brown sugars with a mixer on medium speed until pale and fluffy, about 3 minutes. Add eggs, 1 at a time, beating well after each addition. Beat in flour mixture in 3 additions, alternating with espresso-milk mixture, beginning and ending with flour.

Bake until a toothpick inserted into the centers comes out clean, 20 to 22 minutes. Let cool completely on cooling racks before frosting.


For the coffee glaze:

1/2 cup boiling water

1/4 cup granulated sugar

2 tablespoons instant coffee (not espresso)

1/4 teaspoon vanilla extract

Stir all ingredients in a small bowl until sugar is completely dissolved. Poke several small holes in the top of each cupcake, and drizzle 1-2 tablespoons of glaze on each. Do not be afraid to over-moisten the cupcakes, they will soak up the liquid perfectly.


For the Frosting:

1 1/2 cup + 2 tablespoons granulated sugar

6 large egg whites

Pinch of kosher

1 pound (4 sticks) butter

2/3 cup Caramel sauce

1 tsp vanilla extract

(I just used caramel sauce from the store, but you can also make your own if you'd like, just make sure it's cool before you use it.)

Place the sugar, the egg whites and the salt in the metal bowl of a standing mixer. Place the bowl over a pan of boiling water. Whisk continuously until the sugar is dissolved and the mixture reaches 160°. Be sure to stir from the moment that the bowl touches the heat, or else the egg whites will cook onto the bowl.

Fit the standing mixer with the whisk attachment and put the bowl in place. Beat the mixture on medium-high speed and beat until stiff peaks have formed

Reduce the mixer speed to medium-low and begin adding the butter, a tablespoon or two at a time (it really needs to be room temperature/soft before doing this). Beat until the butter is no longer visible, and add in more, until it is all added. At some point it will look curdled and broken, but just keep on beating and beating until it gets smooth again. This could take a few minutes, but have no fear. It will come together! Just keep beating. I thought it was a lost cause when it looked like scrabbled eggs, but patience is key!

Slowly add in the caramel and vanilla extract. Beat on medium-low until combined and smooth, usually a few minutes.

Frost the cupcakes and drizzle with remaining caramel sauce and you're done!
If you wanted to make them look even fancier, you can make them into little mugs like how I did. But it is definitely time consuming so I only did three mugs! I cheated just a little...
To make the mugs, use white fondant and roll it into long strips and wrap it around the cupcake, but make sure you take the cupcake liner off first, no one wants to bite into paper! Then with the white fondant, form little ears for the mugs and use a bit of water to make it stick. They honestly taste better without the mug though, I have never been a fan of the taste of fondant, but it does look pretty!
Enjoy! A nice SB alternative :)

-Ruby


Wednesday, 11 July 2012

Learn to substitute

It's been a while since I've baked... and last night, I suddenly had the urge to. Looking at my fridge, the only things I had were blueberries, butter and ricotta cheese... as a result, the White Chocolate Mixed Berry Cheesecake came to my mind.


Original recipe:

Serves: 8
1/4 cup unsalted butter
8oz ginger biscuits (cookies)
1/2 cup chopped pecan nuts

For the Filling:
1 1/4 cups mascarpone cheese
3/4 cup ricotta cheese
2 eggs, beaten
3 tbsp caster (superfine) sugar
9 oz white chocolate
1 1/2 cups fresh raspberries

For the Topping:
1/2 cup mascarpone cheese
1/3 ricotta cheese
white chocolate curls and fresh raspberries to decorate


After digging into my baking supplies and found staled ginger cookies... since I was so determined to make this cheesecake, I actually found a recipe that uses rolled oats and granola for a cheesecake base. Of course, I also didn't want to buy marscapone cheese. Things that Google will do for ya! After all the tweaking, my modified recipe looks like this.


Serves: 4 (I didn't need to extra calories so I halved the recipe)

1/8 cup unsalted butter
1 1/2 cup Quaker Harvest Crunch granola cereal
1/4 cup chopped pecan nuts

For the Filling:
3/4 cup ricotta cheese blended with 3/4 cup of heavy cream
1/4 cup ricotta cheese
1 eggs, beaten
1 tbsp white sugar
5 oz white chocolate
2/4 cup fresh raspberries + 1/4 cup blueberries

For the Topping:
1/4 cup ricotta cheese + 1/4 cup heavy cream
1/3 ricotta cheese
white chocolate curls and fresh raspberries and blueberries to decorate


1. Preheat oven to 300F.

Crush the biscuits. Melt the butter in a pan, then stir in biscuits and nuts. Press into pan. Level the surface.

2. Make the filling by mixing the cheese then beat in the egg. Add the sugar and beat until sugar has dissolved and the mixture is smooth and creamy.

3. Chop and melt the white chocolate over simmering water, then stir into the cheese mixture.  This is when I also prepared some chocolate swirls. The failed piece was melted and the pretty ones were saved as decorations :)

Add the berries in add mix gently.

4. Tip into the prepared tin and spread evenly. Bake for 1 hour or until just set. Be patient. Don't try to speed up cook time by turning the heat up. Switch off the oven and leave the cheesecake inside until cold.

5. Remove the sides of the tin. Make topping by mixing the ricotta cheese and heavy cream in a bowl then spread it over the cheesecake. Decorate with curls and berries.

This is a really simple recipe :) I'm eating a slice as I am publishing this blog. Hope you all will enjoy it!

Tuesday, 24 April 2012

French Macarons

... "A sweet meringue-based confectionery made with egg whites, icing sugar, granulated sugar, almond powder and food colouring" (Wikipedia, 2012) Yes, that's exactly what it is. A tasty treat that has won the hearts of millions across the globe. Introducing our two new (& only) flavours:

1) [Left] Mocha: Coffee flavoured macarons filled with mocha butter cream
2) [Right] Double Green Tea: Green tea flavoured macarons filled with green tea ganache. 


Recipe:

Ingredients:
1 1/2 cups of icing sugar
3/4 cup ground almonds
1/2 cup of egg whites (about three eggs)
a pinch of salt
3 tablespoons caster/superfine sugar (we used icing sugar)
a piping bag
2 solid baking sheets, lined with parchment paper

Instructions:
1)Preheat oven to 325oC. Combine icing sugar and almonds into a bowl. Set aside.
2) Using a spotlessly clean and dry bowl, beat egg white and salt with an electric handheld whisk until they hold a stiff peak
3) Continue to whisk at medium speed while adding caster sugar a teaspoonful at a time. Mix well between each addition before adding the next. The mix should be thick, white and glossy.
4) Add food colouring paste you're using. Dip a cocktail stick into the paste, stir into the mixture thoroughly to ensure colour is evenly blended. Scrape down sides of bowl with spatula.
5) Using a large metal spoon, fold the ground sugar and almond mixture into egg white.
6) Fill the piping bag with the mixture and pipe evenly sized rounds - about 5cm/2 inches across- onto the prepared baking sheets.
7) Tap the bottom of the baking sheets sharply, once, on the work surface to expel any large air bubbles.
8) Leave the macarons for at least 15 mins, and up to an hour, until they have set and formed a dry shell. They should not be sticky, tacky or wet when tested with your finger tips.
9) Bake on middle shelf, one sheet at a time for 10 mins. Tops should be crisp and bottoms dry. Leave to cool on the baking sheet.

For the buttercream, I only used a basic butter cream icing and added melted dark chocolate and instant coffee. As for the green tea ganache, it was prepared by my friend and we were privileged to use it. <3 

Tips: Patience is the key to success. Give it a try and you can enjoy fresh made macarons at home too!

Tuesday, 6 March 2012

Matcha Azuki Bean Entremet


Matcha MADNESS
Last time I had posted a blog on a Matcha cake, I told you I baked a lot that weekend. I kinda went on a Green Tea craze where I lived and breathed this oriental fad everyday...for three whole days. But really, it's not even an Asian thing anymore, green tea is really everywhere now, and also literally in everything. The other day I even came across the beauty supplier and saw hair removal wax that was "green tea"...not even sure what that means! Who cares what wax smells like when it's on and off in a matter of seconds, and all you would be thinking about is how god damn much personal grooming hurts, not what smell is lingering in the air!

Anyways, that was totally off topic. So now I present to you all the other..more evil twin of the two desserts I had made that weekend..the Matcha Azuki Bean Entremet. Don't worry if you have no idea what Entremet is..I didn't know either until I made this and googled it. So google it if you want to know too! Ha..thought I would make it easy for you, didn't you? Just kidding, it's really not important. What is though, is what is in this cute little multi layer sweet. To start off, the two yellow layers you see are vanilla sponge cakes, sandwiched in the middle of the two is a azuki bean chocolate ganache, above those would be a layer of green tea mousse and topped off with a layer of green tea whipped cream. The best way to make this dessert would be to use mousse rings and layer everything in that, in order to maintain a neat shape (like these for example). But I couldn't find any at the time since everything I make never seems to involve good planning. I used a loaf pan instead to layer everything in. It seemed to work alright, but it was difficult to maintain the shape and neat colors of the layers, but regardless, it tasted amazing! Here's how it's made...

Vanilla Sponge Cake
Ingredients:
3 Eggs at room temperature
1/3 cup White Sugar
1/2 cup Cake Flour
1/8 cup Unsalted Butter, melted
1 Tbsp Vanilla Extract

Directions:
1) Line an 8" square jelly roll pan with parchment paper, preheat oven to 350 degrees
2) With an electric mixer, beat eggs and sugar on HIGH for 7 minutes, or until it has doubled in volume
3) Turn on LOW speed and beat for another minute
4) Sift flour into the mixture in three separate additions, folding gently but quickly with a rubber spatula
5) Add the melted butter and vanilla and fold until well blended
6) Pour batter into pan and bake for 10-15 minutes, until surface is slightly golden brown or a toothpick inserted comes out clean
7) Let cool, then either cut portions out with the mousse rings, or else cut cake into shape of whatever pan you decide to use to build the layers in. You will need pairs of 2 for how many ever you decide to make

Azuki Bean Chocolate Ganache
Ingredients:
1 cup Semi-sweet Chocolate
1/2 cup Whipping Cream
1 cup Red Bean Paste

Directions:
Heat up cream on stovetop until just boiling. Pour onto a bowl with the chocolate. Stir until smooth. Stir in Red Bean Paste.

Matcha Mousse (Make when Step 2 of assembly is complete)
Ingredients:
3/4 cup Whole Milk
2 tsp Matcha Powder
1/4 cup White Sugar
6 g gelatin powder
1/2 cup Whipping Cream

Directions:
1) Combine sugar and matcha powder, mix until blended
2) Heat up milk until boiling, then pour into the bowl with the sugar and matcha mixture. Stir until smooth.
3) While mixture is still hot, quickly add gelatin powder into the bowl, stir until dissolved
4) In a separate bowl, whip the cream until stiff peaks form
5) Fold Whipped Cream into matcha mixture until well blended

Matcha Whipped Cream (Make after step 3 of assembly is complete)
Ingredients:
200 ml Whipping Cream
1/8 cup White Sugar
1 tsp Matcha Powder

Directions:
1) In a bowl, combine sugar and matcha powder, mix until blended
2) Gradually add cream into the mixture, beating on LOW
3) Once all the cream is added, beat on HIGH until stiff peaks form

PUTTING IT ALL TOGETHER
1) Place first layer of sponge cake at the bottom of the pan or mousse ring
2) Spread ganache evenly over sponge cake, and top with the second sponge, press lightly to make sure there are no gaps in the three layers so far. Refrigerate for an hour or two.
3) Pour the mousse over the layers and refrigerate for at least 2 hours
4) Pour the whipped cream on top of the mousse layer and spread evenly. Refrigerate overnight.
5) Finish it off by lightly dusting the top of the cake with a bit of matcha powder and icing sugar.

If you used mousse rings, it will be easy to just slide the rings off. If you used a loaf pan like me, you will have to cut cake into several pieces, skimming the sides of the cake with a knife to loosen from pan, and carefully take cake out piece by piece. I completely ruined the first piece because it's impossible to keep the first one looking nice, but the rest were a lot easier to get out! Yes...SUPER time consuming, but all so worth it!

ENJOY!

Tuesday, 28 February 2012

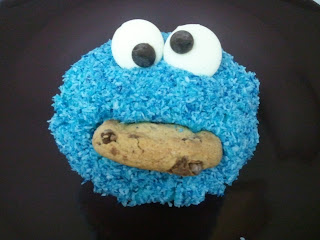
Cookie Monster Cupcakes

I guess it's about time I share a "Sweet Talk" moment. I have always wanted to make cute cupcakes without the hassle of working with fondant. Since no one is ever too old for some Sesame Street, here is my very first Cookie Monster cupcake!  


This is really a typical cupcake. I was feeling something fruity today so I used a strawberry cake base in oppose to a typical white cake. I dyed some butter cream icing and sprinkled coloured coconuts shreds to give the fuzzy texture. Oh, and of course, how can I forget the chocolate chip cookie! I took a sharp knife to cut a mouth and inserted half of a cookie into the mouth. 


Here are some decorating tips I gathered from various Cookie Monster cupcake recipes I found online:


1)The mess free way to dye shredded coconut is definitely by shaking it up with food colouing in a bag.
2) The eyes were made with white candy melts and chocolate chips.  
3) To give the cupcake a bit of texture, I used the star tip.  


And after the sprinkling and assembling... here it is!


Give it a try. I will guarantee that you will bring someone a smile :) 


Sunday, 26 February 2012

Matcha Chiffon Cake with Whipped Azuki Bean Filling and Cream Cheese Frosting

Tea Time!
This weekend, I baked...a lot. It all started when my mom asked me what kind of Asian I am when I repetitively declined her offers of green tea ice cream back at home. I also noticed that everytime my family and friends went to Japanese restaurants, they would for sure order green tea ice cream for dessert. I quickly realized that I may be an exception in being the only one that did not enjoy this ridiculously popular flavor amongst my culture. And then not so quickly...I caved, I finally gave into the multiple requests I was getting to make a matcha flavored cake. So here it is, my very own matcha chiffon cake with whipped azuki bean filling and iced with a light cream cheese frosting!

Green Tea Chiffon Cake
Ingredients:
(Makes one of the two 10-inch layers)
3 Egg yolks
1/3 cup Sugar
1/4 cup Vegetable oil
1/4 cup Water
3/4 cup Cake Flour - Sifted
1/8 cup Matcha (Green Tea powder) - Sifted
4 Egg whites

Directions:
1) Preheat oven to 350F
2) Beat egg yolks, 1/3 of the sugar, oil and water together
3) Pour in sifted flour and matcha, beat until totally incorporated
4) In another bowl, whip the egg whites until foamy. Pour in half the remaining sugar and beat for 2 minutes. Add in the rest of the sugar and beat until soft peaks form.
5) Place 1/3 of the beaten egg whites into the flour mixture. Use a whisk to quickly mix everything together.
6) Add the rest of the egg whites, incorporate gently but quickly until well blended. Spatula is recommended in order to gently fold the mixture.
7) Pour batter into lightly greased cake tin
8) Bake for 20 minutes or until a toothpick inserted comes out clean.

x2

Whipped Azuki Bean Filling
Ingredients:
1/2 cup Azuki Bean Paste
1/2 cup Icing Sugar
1/2 cup Whipping Cream

Directions:
1) Combine Azuki Bean Paste and Icing Sugar in a large bowl
2) In a sepearte bowl, whip cream until soft peaks form
3) Fold whipped cream into bean mixture

Light Cream Cheese Frosting
Ingredients:
3 cups Icing Sugar
4 tbsp Whipping Cream
1 cup Unsalted Butter (softened)
1 tbsp Vanilla
4 oz Cream Cheese (cold)

Directions:
1) Beat butter and cream cheese in a large bowl until creamy
2) Add whipping cream and beat on medium-high speed for a couple minutes until fluffy
3) Slowly add in vanilla and icing sugar, beat until fully incorporated

I tinted the icing to a light green hue, to go with the matcha theme. After stacking the two cakes together with the azuki filling in between, spread a thin layer of frosting just to cover the entire cake. Put the rest in a piping bag and use a Wilton 2D tip to make rose swirls all over the cake. If there are gaps between roses, add a curved swipe or overlap with another rose swirl. For a simple turorial on how to make those rose swirls, you can check out this youtube video I found that shows the technique on a cupcake! Rose Swirl Technique Video

Done! A sense of accomplishment and more in touch with my culture ;)

Banana Pupcakes with Peanut Butter Cream Cheese Frosting


No, it's not a typo...I actually do mean Pupcakes (Cupcakes for Puppies)!

Whether it is baking with friends or alone, my home kitchen has always been my favorite place to bake. Not only is it convenient to know where every pan and ingredient is, I also pretty much never have to sweep! I have a very diligent helper every time I enter the kitchen. He has always been on top of it and taking care of any yummy crumbs that may make its way to the floor. But as he is getting older now, my elderly dog doesn't have the energy to patrol the kitchen grounds, so I have dedicated a whole batch of cupcakes just for him. He has probably waited his whole life for the chance to have all the cupcakes to himself! Meet my newest experiment, the pupcakes!

They are made with all natural ingredients with no added artificial flavoring, coloring or preservatives, should most definitely safe for your beloved puppy. The only note is that many dogs may be lactose intolerant, so they may not react well to the milk or cream cheese in these. But other than that, these would make as great occasional treats for the pup!

Banana Cupcake (adapted from The Poop Pantry)
Ingredients:
2 cups Water
2 Bananas (mashed)
1 tsp vanilla
3 cups Flour
1 tbsp Baking Powder
1 Egg
2 tbsp Honey

Directions:
1) Heat oven to 350 degrees.
2) In a medium bowl, blend flour and baking powder together.
3) In a large bowl, combine egg, honey, and vanilla. Mix well.
4) Add mashed banana in with the egg combination.
5) Add flour mixture and water into the large bowl, alternating a couple times, beat just until all ingredients arr fully incorporated.
6) Bake for 20 minutes or until inserting a toothpick that comes out without sticking.

Note: I think because of the honey, the cake stuck onto regular cupcake liners like glue. So I would recommend using silicon liners or pans. I poured mine into mini cupcake pans because regular sized cupcakes for my little 6 lb. pup would be way too much!

Peanut Butter Cream Cheese Frosting
Ingredients:
1/2 cup Lowfat Cream Cheese, at room temperature
1/4 cup Peanut Butter

Directions:
Whip the cream cheese and peanut butter together until light and fluffy. Pipe the frosting on cooled cupcakes.

Unfortunately I cannot give you the recipe to the cute little heart shaped dog treats on top of the pupcakes because they were store bought. Just some random ones I found lying around the house in the treats cupboard! But some sweet things to decorate with would be melted carob drizzled on top for a chocolatey flavor!

Hope your pup enjoys these, I know mine sure did!


Monday, 13 February 2012

Color Therapy


TASTE THE RAINBOW

Cold winter days are hard enough, add the words gray and gloomy in it and it would be the type that makes you want to cuddle inside and enjoy a lazy day. As psychological studies have indicated, colors can improve a person's mood, make these rainbow cupcakes and it will bring you out of the seasonal blues! Even if you don't believe in color therapy, the smell of fresh baking and treat for the taste buds will definitely do it!


These little cupcakes were time consuming, but the end product is totally worth it. I don't think I would have the patience to make them on a random day again, but will be one to go to for special occasions like a kid's birthday or something, as it reminds me of a clown's colorful outfit and ruffled collar! 


1) Make a white vanilla cake batter (either from scratch or box cake mix)
2) Separate batter into 6 small bowls
3) Add and mix the following colors to create different colored batter: Purple, Blue, Green, Yellow, Orange, Red
4) Pour and layer the colored batter into cupcake liners in the above order
5) Bake for the time indicated for your cake recipe
6) Let cupcakes cool
7) Ice away!


For the frosting, I made a marshmallow fluff frosting, a recipe that I had found online a while back. Makes enough to frost 2 dozen mini cupcakes or so.


Ingredients:
2 cups of Butter
2 jars of Marshmallow creme
3.5 cups of Icing sugar
2 tsp. Vanilla extract


Beat butter in a large bowl until creamy. Add marshmallow creme and incorporate well into butter. Add sugar and vanilla slowly. Beat until light and fluffy. 


ENJOY!