Pages

Tuesday 28 February 2012

Cookie Monster Cupcakes

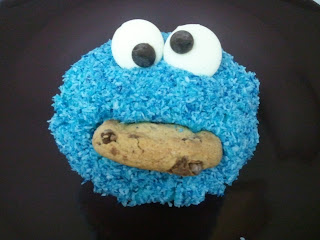
I guess it's about time I share a "Sweet Talk" moment. I have always wanted to make cute cupcakes without the hassle of working with fondant. Since no one is ever too old for some Sesame Street, here is my very first Cookie Monster cupcake!  


This is really a typical cupcake. I was feeling something fruity today so I used a strawberry cake base in oppose to a typical white cake. I dyed some butter cream icing and sprinkled coloured coconuts shreds to give the fuzzy texture. Oh, and of course, how can I forget the chocolate chip cookie! I took a sharp knife to cut a mouth and inserted half of a cookie into the mouth. 


Here are some decorating tips I gathered from various Cookie Monster cupcake recipes I found online:


1)The mess free way to dye shredded coconut is definitely by shaking it up with food colouing in a bag.
2) The eyes were made with white candy melts and chocolate chips.  
3) To give the cupcake a bit of texture, I used the star tip.  


And after the sprinkling and assembling... here it is!


Give it a try. I will guarantee that you will bring someone a smile :) 


Sunday 26 February 2012

Matcha Chiffon Cake with Whipped Azuki Bean Filling and Cream Cheese Frosting

Tea Time!
This weekend, I baked...a lot. It all started when my mom asked me what kind of Asian I am when I repetitively declined her offers of green tea ice cream back at home. I also noticed that everytime my family and friends went to Japanese restaurants, they would for sure order green tea ice cream for dessert. I quickly realized that I may be an exception in being the only one that did not enjoy this ridiculously popular flavor amongst my culture. And then not so quickly...I caved, I finally gave into the multiple requests I was getting to make a matcha flavored cake. So here it is, my very own matcha chiffon cake with whipped azuki bean filling and iced with a light cream cheese frosting!

Green Tea Chiffon Cake
Ingredients:
(Makes one of the two 10-inch layers)
3 Egg yolks
1/3 cup Sugar
1/4 cup Vegetable oil
1/4 cup Water
3/4 cup Cake Flour - Sifted
1/8 cup Matcha (Green Tea powder) - Sifted
4 Egg whites

Directions:
1) Preheat oven to 350F
2) Beat egg yolks, 1/3 of the sugar, oil and water together
3) Pour in sifted flour and matcha, beat until totally incorporated
4) In another bowl, whip the egg whites until foamy. Pour in half the remaining sugar and beat for 2 minutes. Add in the rest of the sugar and beat until soft peaks form.
5) Place 1/3 of the beaten egg whites into the flour mixture. Use a whisk to quickly mix everything together.
6) Add the rest of the egg whites, incorporate gently but quickly until well blended. Spatula is recommended in order to gently fold the mixture.
7) Pour batter into lightly greased cake tin
8) Bake for 20 minutes or until a toothpick inserted comes out clean.

x2

Whipped Azuki Bean Filling
Ingredients:
1/2 cup Azuki Bean Paste
1/2 cup Icing Sugar
1/2 cup Whipping Cream

Directions:
1) Combine Azuki Bean Paste and Icing Sugar in a large bowl
2) In a sepearte bowl, whip cream until soft peaks form
3) Fold whipped cream into bean mixture

Light Cream Cheese Frosting
Ingredients:
3 cups Icing Sugar
4 tbsp Whipping Cream
1 cup Unsalted Butter (softened)
1 tbsp Vanilla
4 oz Cream Cheese (cold)

Directions:
1) Beat butter and cream cheese in a large bowl until creamy
2) Add whipping cream and beat on medium-high speed for a couple minutes until fluffy
3) Slowly add in vanilla and icing sugar, beat until fully incorporated

I tinted the icing to a light green hue, to go with the matcha theme. After stacking the two cakes together with the azuki filling in between, spread a thin layer of frosting just to cover the entire cake. Put the rest in a piping bag and use a Wilton 2D tip to make rose swirls all over the cake. If there are gaps between roses, add a curved swipe or overlap with another rose swirl. For a simple turorial on how to make those rose swirls, you can check out this youtube video I found that shows the technique on a cupcake! Rose Swirl Technique Video

Done! A sense of accomplishment and more in touch with my culture ;)

Banana Pupcakes with Peanut Butter Cream Cheese Frosting


No, it's not a typo...I actually do mean Pupcakes (Cupcakes for Puppies)!

Whether it is baking with friends or alone, my home kitchen has always been my favorite place to bake. Not only is it convenient to know where every pan and ingredient is, I also pretty much never have to sweep! I have a very diligent helper every time I enter the kitchen. He has always been on top of it and taking care of any yummy crumbs that may make its way to the floor. But as he is getting older now, my elderly dog doesn't have the energy to patrol the kitchen grounds, so I have dedicated a whole batch of cupcakes just for him. He has probably waited his whole life for the chance to have all the cupcakes to himself! Meet my newest experiment, the pupcakes!

They are made with all natural ingredients with no added artificial flavoring, coloring or preservatives, should most definitely safe for your beloved puppy. The only note is that many dogs may be lactose intolerant, so they may not react well to the milk or cream cheese in these. But other than that, these would make as great occasional treats for the pup!

Banana Cupcake (adapted from The Poop Pantry)
Ingredients:
2 cups Water
2 Bananas (mashed)
1 tsp vanilla
3 cups Flour
1 tbsp Baking Powder
1 Egg
2 tbsp Honey

Directions:
1) Heat oven to 350 degrees.
2) In a medium bowl, blend flour and baking powder together.
3) In a large bowl, combine egg, honey, and vanilla. Mix well.
4) Add mashed banana in with the egg combination.
5) Add flour mixture and water into the large bowl, alternating a couple times, beat just until all ingredients arr fully incorporated.
6) Bake for 20 minutes or until inserting a toothpick that comes out without sticking.

Note: I think because of the honey, the cake stuck onto regular cupcake liners like glue. So I would recommend using silicon liners or pans. I poured mine into mini cupcake pans because regular sized cupcakes for my little 6 lb. pup would be way too much!

Peanut Butter Cream Cheese Frosting
Ingredients:
1/2 cup Lowfat Cream Cheese, at room temperature
1/4 cup Peanut Butter

Directions:
Whip the cream cheese and peanut butter together until light and fluffy. Pipe the frosting on cooled cupcakes.

Unfortunately I cannot give you the recipe to the cute little heart shaped dog treats on top of the pupcakes because they were store bought. Just some random ones I found lying around the house in the treats cupboard! But some sweet things to decorate with would be melted carob drizzled on top for a chocolatey flavor!

Hope your pup enjoys these, I know mine sure did!


Monday 13 February 2012

Color Therapy


TASTE THE RAINBOW

Cold winter days are hard enough, add the words gray and gloomy in it and it would be the type that makes you want to cuddle inside and enjoy a lazy day. As psychological studies have indicated, colors can improve a person's mood, make these rainbow cupcakes and it will bring you out of the seasonal blues! Even if you don't believe in color therapy, the smell of fresh baking and treat for the taste buds will definitely do it!


These little cupcakes were time consuming, but the end product is totally worth it. I don't think I would have the patience to make them on a random day again, but will be one to go to for special occasions like a kid's birthday or something, as it reminds me of a clown's colorful outfit and ruffled collar! 


1) Make a white vanilla cake batter (either from scratch or box cake mix)
2) Separate batter into 6 small bowls
3) Add and mix the following colors to create different colored batter: Purple, Blue, Green, Yellow, Orange, Red
4) Pour and layer the colored batter into cupcake liners in the above order
5) Bake for the time indicated for your cake recipe
6) Let cupcakes cool
7) Ice away!


For the frosting, I made a marshmallow fluff frosting, a recipe that I had found online a while back. Makes enough to frost 2 dozen mini cupcakes or so.


Ingredients:
2 cups of Butter
2 jars of Marshmallow creme
3.5 cups of Icing sugar
2 tsp. Vanilla extract


Beat butter in a large bowl until creamy. Add marshmallow creme and incorporate well into butter. Add sugar and vanilla slowly. Beat until light and fluffy. 


ENJOY!